Photo displayer
ECE5725 Final Project
By Zhuoheng Li(zl764), Xinyun Guo(xg284)
Demonstration Video
Introduction
Our project is a photo displayer with two components: a web application which allows users to upload pictures to the Raspberry Pi; a slideshow application reads photos from the server, displays them on the touch screen, and controlled by six functional touch-screen buttons, including lock the current photo (stop the transition), switch to the previous and next photos, speed up or down the transition time, and quit the program.
Just imagine that you can upload a new selfie to the server through the web application, and all your family members can see it on the Raspberry Pi at home. Don’t hesitate, share your photos with your family!

Figure 1: Application Panel
Project Objective
- Allow users to upload pictures on the web application to Raspberry Pi
- Raspberry Pi receives photos that users uploaded and stores it in a local database
- Allow users to control the display with six functional touch-screen buttons
Design and Testing
High Level Architecture
The process of our design is shown in the figure below: first, users send photos through the web application; then the Pi acts as a server to receive the uploaded images data; after receive those photos, the Pi will save those photos to the database, which in our case a directory; finally, the slideshow application is able to retrieve photos from the database and display them on touch screen.
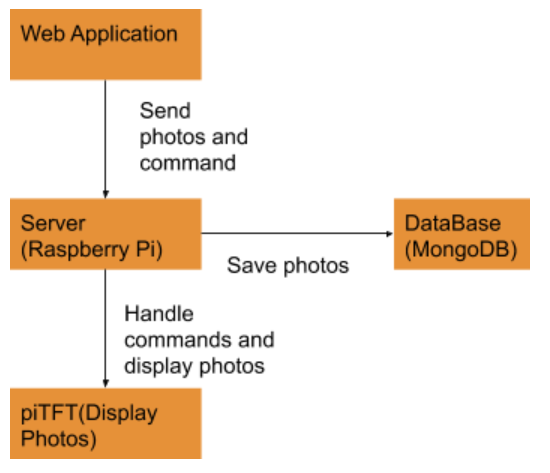
Figure 2: High-Lvel Architecture diagram
Web Application
We designed a web application for users to upload images from their laptops. The webpage is designed to have two features: to give a title name of the photo users uploaded, to select the local files from users’ end and upload the photos, as indicated in Figure 3 below.
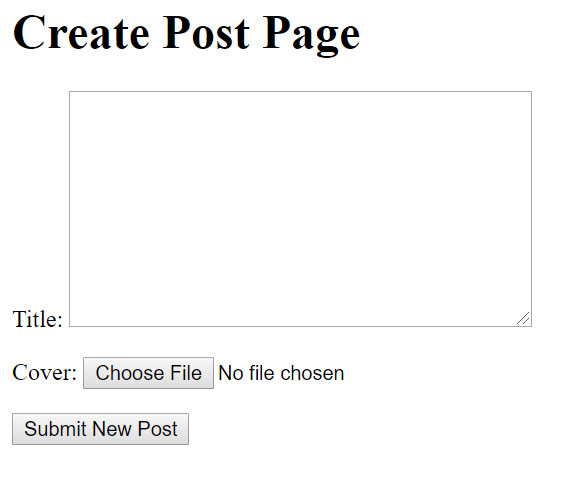
Figure 3: user interface of web application
We chose to use Django to build our web server. After installing Django on the Raspberry Pi, we discussed and figured out the abstract model needed to be used in this project. Then, we wrote the model of the object we want to upload which was a class Image. Inside this model, we defined the fields image_name and ImageField. At last, we defined the target folder we were going to send photos to.
Testing
After programming and building the connection to Pi, we run the server from Pi and access the page with the corresponding address from another laptop. We followed the upload process as indicated in Figure 4 below: select an image file from local, name the file, and then click the submit button. The webpage indicated the image has been successfully uploaded. Then, we checked the Pi and found that image under the specific directory. The test result shown the Pi successfully received the images from the users’ end and stored them at the directory as we defined. The web application functioned as we expected.
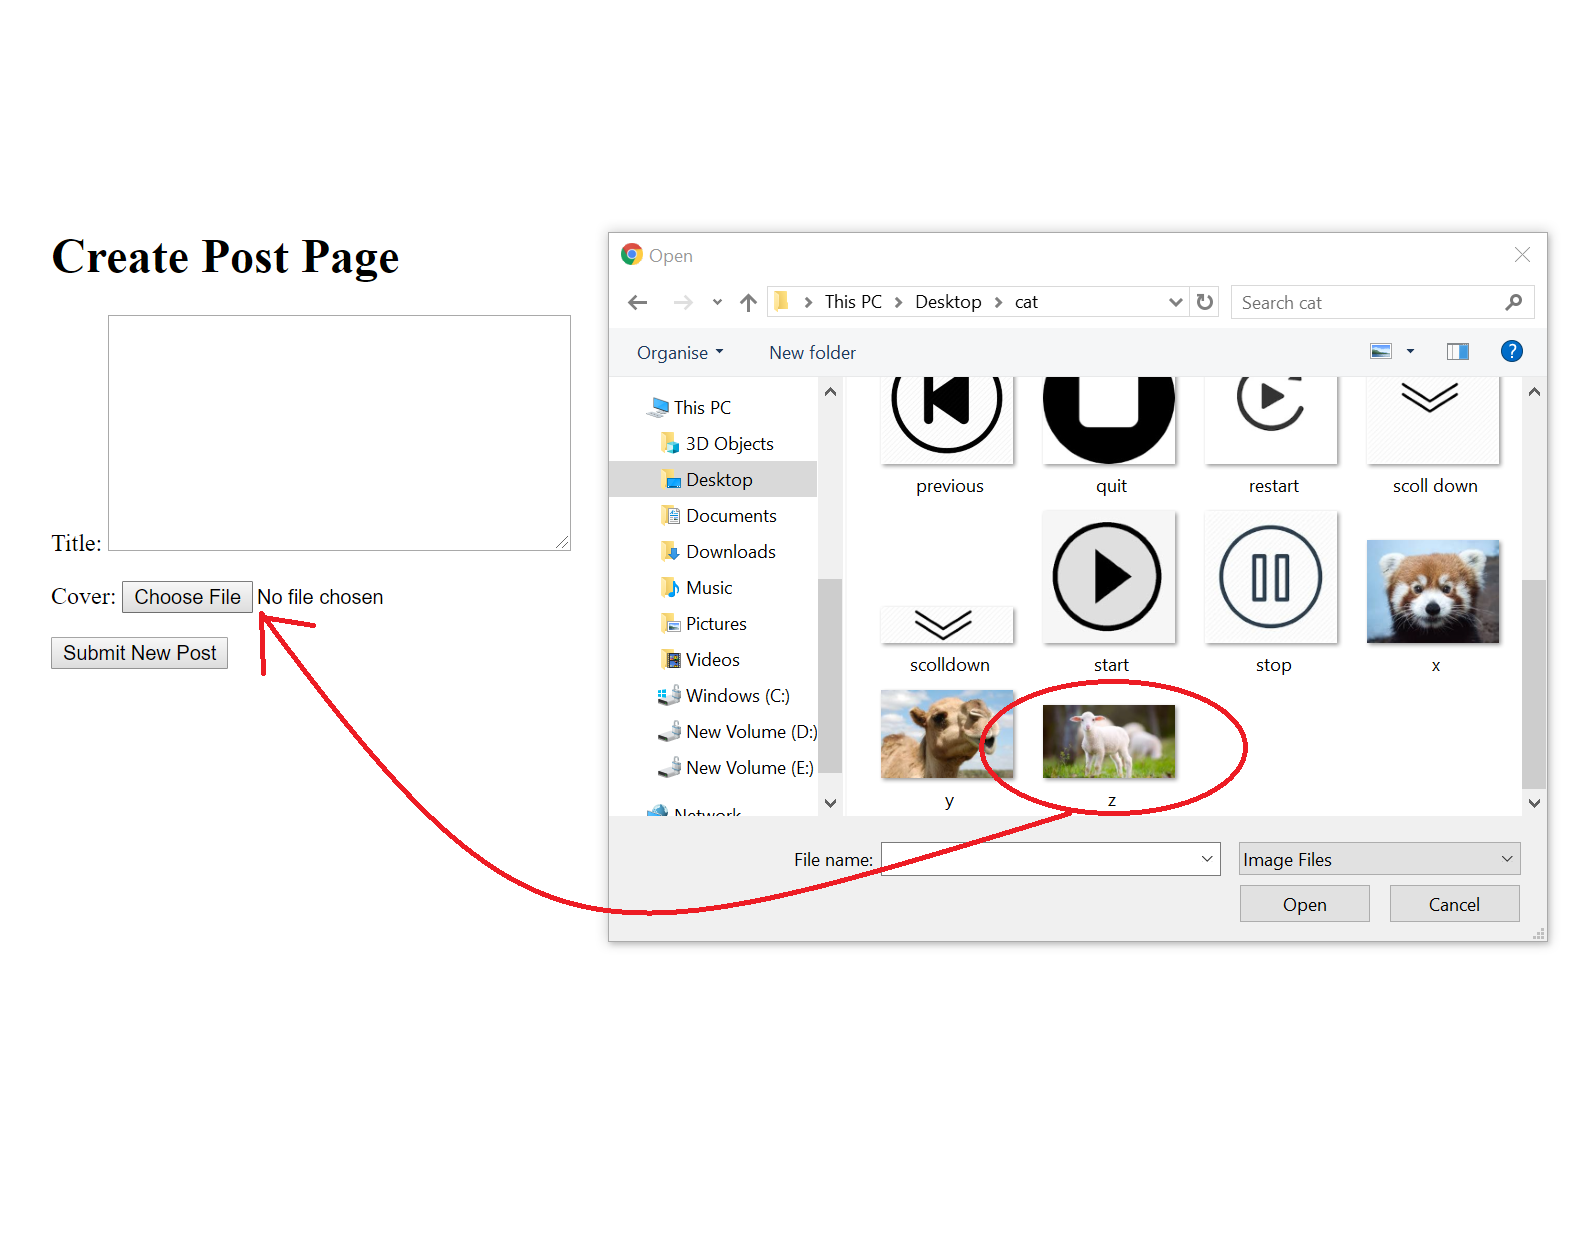
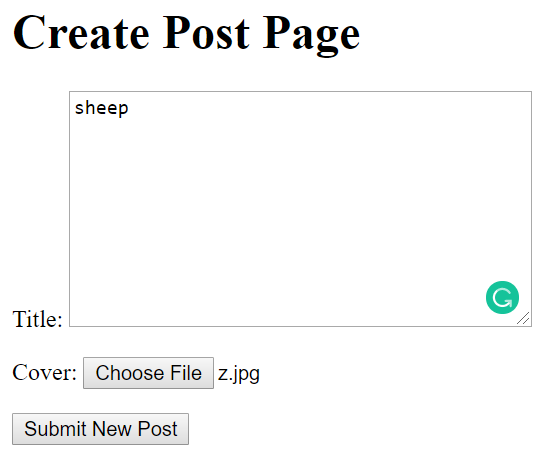
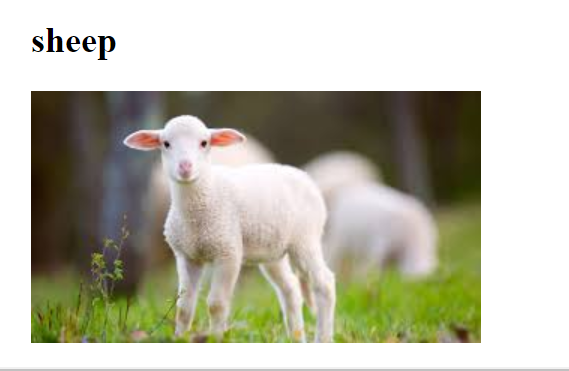
Figure 4: uploading process
Slideshow Application
We also need a slideshow application to achieve the display functionality on the touch screen. The user interface is mainly two panels as shown in the figure below: a thumbnail panel for user to have an overview of all photos in the directory and choose which one they want to display; a display panel which contains six control buttons for users to control the transition of the display.
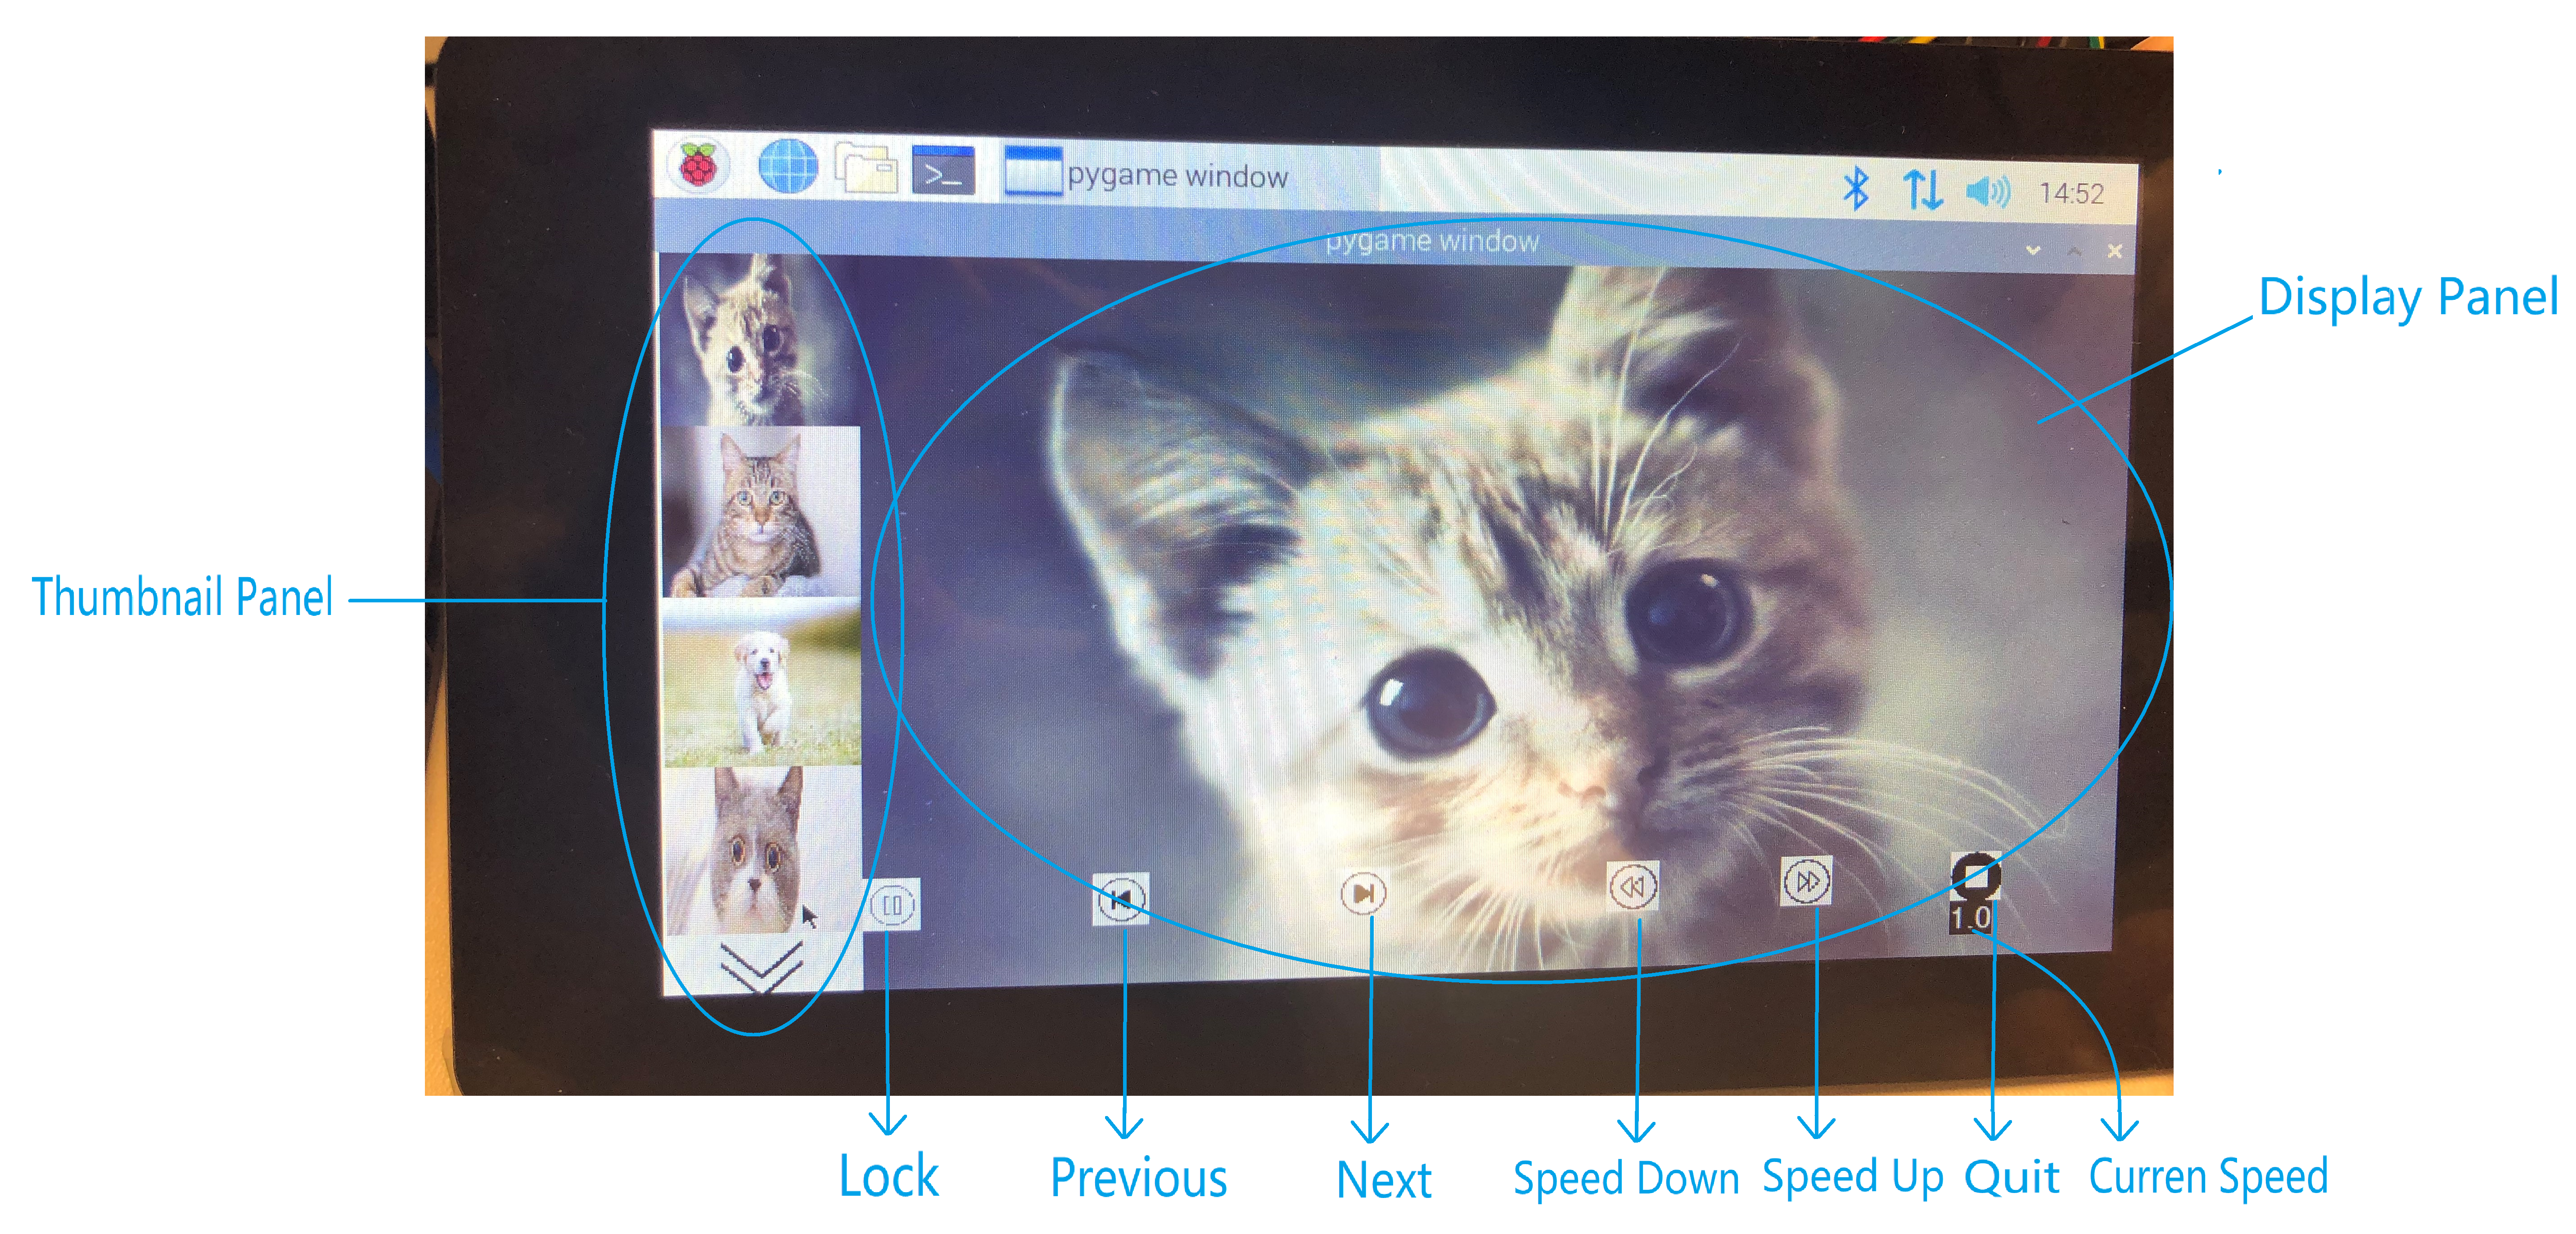
Figure 5: Slideshow application UI
At the beginning of the program, we first need to load all the photos into a list. To do this, we used glob library to read all the valid image files under a default folder. The glob library is a Unix style pathname pattern expansion that will match all the files under the folder with the given types. We only need to use several loops to loop through the folder and get any types we want.
To display photos on touch screen, we choose PyGame since it is easy to implement on Pi and has touch functionality which match our objectives for control buttons. We first created a surface in Pygame. Then we created ‘rect’ for all photos from the list of photos we read from the directory and define the coordinates where we want photos to display. By using the flip() function, the photos can be displayed on the screen at the place we want.
To split the screen into two panels, we need to set coordinates based on the panel positions we want. We set one sixth of the screen be the thumbnail panel, and the rest be the display panel(main panel). On the thumbnail panel, maximum four thumbnail size (100*100) photos will be displayed and a scroll down button to preview photos in the directory. On the display panel, the first photo on the list will be displayed once the program starts, and it will automatically switch photos as a slideshow.
To achieve the automatic switching function, we wrote a loop to change the index, which corresponds to the photo to display in the list of stored all photos, based on running time. To be specific, we set an interval time, which default is 5 seconds. Once the current photo has been displayed for 5 seconds, the index will plus one, which means the display photo will be switch to the next photo in the photo list. Detailed code can be found in appendix.
Six Functional Buttons Demonstration Video
Six functional buttons description:
- Locking the photo: We designed the function of locking current pictures if the user like this photo and don’t want to switch it away. When the photo is locked, the automatic switching function will be disable, but the other photo functions still works under this mode.
- Switching to the previous photo: This function is used to switch over to the last photo, it works no matter the current photo is locked or not.
- Switching to the next photo: This function is used to switch over to the next photo, it works no matter the current photo is locked or not.
- Speeding up: The interval of switching photos will be decreased by pressing this button, which means the transition speed will be increased. The default switching interval is 5 seconds. The maximum switching speed is 1 second per photo.
- Slowing down: The interval of switching photos will be increased by pressing this button. The minimum switching speed is 15 seconds per photo.
- Quit: This button is for quitting the program. After clicking this button, the program will be terminated immediately and return to the desktop.
To design the touch functional buttons, we also need to use PyGame. For instance, to design the touch button to quit the program, we first need to define the position of the icon for that button. Then, we use the event.get() to detect any possible hits on the screen and pygame.mouse.get_pos() to detect the coordinates of the hits. If the hits has been detected within the button position as we defined, the system will run specific function. Therefore, touching ‘quit’ button ends the program and returns to the Linux console screen. Similarly, six functional buttons can be programmed.
Testing
We tested the preview function that allows the user to preview all the photos loaded onto the queue. If the user taps the picture on the preview panel, that photo will be displayed on the main panel too. When we tested this function, we found out that the thumbnail may disappear if pressed. In addition, clicking the scroll down button, all the photos should move up to the upper box and the new photo would show up at the bottom of the preview panel. However, we noticed that the new photo appears at the top and all the photos didn’t wrap around. To fix that, we changed our algorithm and added an arraylist to store the index of photos to display in the queue. With the help of the arraylist, the photo index can be read and the corresponding photo will flip on the panel. Thus, when the scroll button has been clicked, the arraylist will be updated and the photos will be wrap around as we expected.
When testing the time switching buttons, we found an error that wasn’t noticeable. The error happens if the user taps on speed up button too many times, and the console will show an error message ‘integer division or modulo by zero’. This happened because when the speed increased, the interval time will be shortened at the same time. If the user taps on speed up button too many times, the interval time will be very close to zero which give such error message. To fix this, we set a minimum interval time 1 second, which means the maximum speed switching speed is 1 second per photo.
After debugging, panels displayed well and all functions performed as we expected.
Result
We were able to successfully accomplish all of the outlined objectives in our project description. Our web application is able to upload photos from users’ end to the Raspberry Pi and the Pi can successfully store those uploaded photos to a specific path as we defined. The slideshow desktop application also works as we expected. Once the user clicks on the shortcut icon on the desktop, the application will start. The thumbnail panel and display panel performs well and all six control buttons function as we designed.
However, during the design process, we have encountered some problems with the implement of Django. The biggest challenge is to establish a connection between Pi and web applications. After we investigated the Django documentation and tried several tutorials, we were able to solve the problem and accomplish the goals.
Conclusion
Overall, we achieved the project features we designed and finished the project within 4 weeks. We learned about how Django works and how it can be integrated with Raspberry Pi. We found it as a useful tool to establish a web application with available templates packages and also easy to implement on Pi. In the process, we also enhanced our PyGame programming, including to achieve split-screen mode.
Future Work
Given more time to work on this project, we would add more features and embellish the user interface of our web application and Pi application panel. Also, more features can be added, including adding categories to classify pictures, filtering photos in specific categories to display, adding the newly uploaded photos to the queue automatically.
Work Distribution
Project group picture
Zhuoheng Li
zl764@cornell.edu
Designed the web application with Django andslideshow application with PyGame
Xinyun Guo
xg284@cornell.edu
Designed the web application with Django andslideshow application with PyGame
Parts List
- Raspberry Pi $35.00
- Raspberry Pi 7" Touch Screen Display $60.00
Total: $95
References
Django DocumentationPyGame Documentation
Raspberry Pi Touch Screen Documentation
R-Pi GPIO Document
Code Appendix
photodisplayer.py
#photodisplayer.py Xinyun Guo xg284 Zhuoheng Li zl764 lab2 10-09-2019
import RPi.GPIO as GPIO
import time
import pygame
from pygame.locals import*
import os
import sys
import glob
from PIL import Image

pygame.init()
pygame.mouse.set_visible(True)

size = width, height = 800, 420
black = 0, 0, 0
white = 255, 255, 255
bottom_line=350

screen = pygame.display.set_mode(size)
font = pygame.font.SysFont('arial',18)
start = pygame.image.load("/home/pi/final_project/insta_project/logo_pics/start.png")
pause = pygame.image.load("/home/pi/final_project/insta_project/logo_pics/stop.jpg")
restart = pygame.image.load("/home/pi/final_project/insta_project/logo_pics/restart.png")
pre = pygame.image.load("/home/pi/final_project/insta_project/logo_pics/previous.png")
next = pygame.image.load("/home/pi/final_project/insta_project/logo_pics/next.png")
speedup = pygame.image.load("/home/pi/final_project/insta_project/logo_pics/2X.png")
speeddown = pygame.image.load("/home/pi/final_project/insta_project/logo_pics/0.5X.png")
scolldown = pygame.image.load("/home/pi/final_project/insta_project/logo_pics/scolldown.png")
quit = pygame.image.load("/home/pi/final_project/insta_project/logo_pics/quit.png")

quit = pygame.transform.scale(quit, (30, 30))
start = pygame.transform.scale(start, (30, 30))
pause = pygame.transform.scale(pause, (30, 30))
restart = pygame.transform.scale(restart, (30, 30))
pre = pygame.transform.scale(pre, (30, 30))
next = pygame.transform.scale(next, (30, 30))
speedup = pygame.transform.scale(speedup, (30, 30))
speeddown = pygame.transform.scale(speeddown, (30, 30))
scolldown = pygame.transform.scale(scolldown, (100, 40))
scolldownrect = scolldown.get_rect()
scolldownrect.x = 0
scolldownrect.y = 380
startrect = start.get_rect()
startrect.x = 50
startrect.y = bottom_line
quitrect = quit.get_rect()
quitrect.x = 700
quitrect.y = bottom_line
pauserect = pause.get_rect()
pauserect.x = 100
pauserect.y = bottom_line
restartrect = restart.get_rect()
restartrect.x = 100
restartrect.y = bottom_line
prerect = pre.get_rect()
prerect.x = 220
prerect.y = bottom_line
nextrect = next.get_rect()
nextrect.x = 350
nextrect.y = bottom_line
speeddownrect = speeddown.get_rect()
speeddownrect.x = 500
speeddownrect.y = bottom_line
speeduprect = speedup.get_rect()
speeduprect.x = 600
speeduprect.y = bottom_line

def getImages():
    valid_formats = [".png", ".PNG", ".jpeg", ".jpg"]
    path = "/home/pi/final_project/insta_project/media/images/"
    image_list = []
    images_added = set()
    for format in valid_formats:
        for imageName in glob.glob(path + "*" + format):
            if imageName not in images_added:
                images_added.add(imageName)
                image = pygame.image.load(imageName)
                image_list.append(image)
    return image_list

# Get all the images under the directory
picture_list = getImages()
picture_rect_list = []
picture_thumbnail = []
picture_rect_thumbnail=[]
picture_size = [700, 420]

# Creating an array for all the rects of image
for index in range(len(picture_list)) :
    scaled_picture = pygame.transform.scale(picture_list[index], (800, 420))
    picture_list[index] = scaled_picture
    picture_rect_list.append(scaled_picture.get_rect())
    picture_rect_list[index].x=100
    picture_rect_list[index].y=0
for index in range(len(picture_list)) :
    scaled_picture_new = pygame.transform.scale(picture_list[index], (100, 95))
    picture_thumbnail.append(scaled_picture_new)
    picture_rect_thumbnail.append(scaled_picture_new.get_rect())

picture_rect_thumbnail[0].x=0
picture_rect_thumbnail[0].y=0
picture_rect_thumbnail[1].x=0
picture_rect_thumbnail[1].y=95
picture_rect_thumbnail[2].x=0
picture_rect_thumbnail[2].y=190
picture_rect_thumbnail[3].x=0
picture_rect_thumbnail[3].y=285

start_time = time.time()
codeRunning = True
aniRunning = True
isPause = False
current_picture_index=0
thumbnail_index=0
thumbnail_list=[0,1,2,3]
arry_size=len(picture_list)

temp_time=0
interval=5
maxspeed=1
minspeed=15

while time.time()-start_time <300 and codeRunning:
    screen.fill(black)
    screen.blit(start,startrect)
    screen.blit(quit,quitrect)
    for event in pygame.event.get():
        if (event.type is MOUSEBUTTONDOWN):
            mouse = pygame.mouse.get_pos()
            if(quitrect.x-15 < mouse[0] < quitrect.x+40 and bottom_line-30 < mouse[1] < bottom_line+30):
                codeRunning = False
            elif (startrect.x-15 < mouse[0] < startrect.x+40 and bottom_line-30 < mouse[1] < bottom_line+30):
                temp_time=time.time()
                while aniRunning:
                    if(time.time()-temp_time >= interval and not isPause ):
                        temp_time=time.time()
                        if(current_picture_index!=arry_size-1):
                            current_picture_index += 1
                        else:
                            current_picture_index=0
                    screen.fill(black)
                    screen.blit(picture_list[current_picture_index],picture_rect_list[current_picture_index])
                    for index in range(4):
                        screen.blit(picture_thumbnail[thumbnail_list[index]],picture_rect_thumbnail[index])
                    screen.blit(scolldown,scolldownrect)
                    for event in pygame.event.get():
                        if (event.type is MOUSEBUTTONDOWN):
                            mouse = pygame.mouse.get_pos()
                            if quitrect.x-15 < mouse[0] < quitrect.x+40 and bottom_line-30 < mouse[1] < bottom_line+30:
                                aniRunning = False
                                codeRunning = False
                            if pauserect.x-15 < mouse[0] < pauserect.x+40 and bottom_line-30 < mouse[1] < bottom_line+30:
                                if isPause:
                                    isPause = False
                                    #temp_time=time.time()
                                else:
                                    isPause = True
                                    temp_time=time.time()
                            if prerect.x-15 < mouse[0] < prerect.x+45 and bottom_line-30 < mouse[1] < bottom_line+30:
                                if(current_picture_index != 0):
                                  current_picture_index = current_picture_index - 1
                                else:
                                  current_picture_index = arry_size-1
                            if nextrect.x-15 < mouse[0] < nextrect.x+40 and bottom_line-30 < mouse[1] < bottom_line+30:
                                if(current_picture_index != arry_size-1):
                                  current_picture_index = current_picture_index + 1
                                else:
                                  current_picture_index = 0
                            if speeduprect.x-15 < mouse[0] < speeduprect.x+40 and bottom_line-30 < mouse[1] < bottom_line+30:
                                interval=interval/2
                                if interval < maxspeed:
                                    interval=maxspeed
                            if speeddownrect.x-15 < mouse[0] < speeddownrect.x+40 and bottom_line-30 < mouse[1] < bottom_line+30:
                                interval=interval*2
                                if interval > minspeed:
                                    interval=minspeed
                            #thumbnail function
                            if 0 < mouse[0] < 95:
                                if 0 < mouse[1] < 100:
                                    current_picture_index=thumbnail_list[0]
                                if 95 < mouse[1] < 190:
                                    current_picture_index=thumbnail_list[1]
                                if 190 < mouse[1] < 285:
                                    current_picture_index=thumbnail_list[2]
                                if 285 < mouse[1] < 380:
                                    current_picture_index=thumbnail_list[3]
                                if 380 < mouse[1] < 420:
                                    if thumbnail_index+1 < len(picture_thumbnail):
                                        thumbnail_index=thumbnail_index+1
                                        for index in range (3):
                                            thumbnail_list[index]=thumbnail_list[index+1]
                                        if thumbnail_index+3 < len(picture_thumbnail):
                                            thumbnail_list[3]=thumbnail_index+3
                                        else:
                                            thumbnail_list[3]=thumbnail_index+3-len(picture_thumbnail)
                                    else:
                                        thumbnail_index=0
                                        thumbnail_list=[0,1,2,3]

                    if isPause:
                        screen.blit(restart, restartrect)
                    else :
                        screen.blit(pause, pauserect)

                    speed = font.render(str(float(5/interval)),True,white,black)
                    speedrect = speed.get_rect()
                    speedrect.x = 700
                    speedrect.y = bottom_line+30
                    screen.blit(speed,speedrect)
                    screen.blit(pre,prerect)
                    screen.blit(next,nextrect)
                    screen.blit(speedup,speeduprect)
                    screen.blit(speeddown,speeddownrect)
                    screen.blit(quit,quitrect)
                    pygame.display.flip()

        elif(event.type is MOUSEBUTTONUP):
            mouse = pygame.mouse.get_pos()

    pygame.display.flip()